
Sidebar
public:module:hyper-v:create_backup_set_cluster
Create Backup Set for Hyper-V Cluster Environment
Requirements for Hyper-V Cluster backup sets:
1. Same version of CloudBacko Pro must be installed on all Hyper-V Cluster nodes.
2. Backup schedule must be enabled on ALL Hyper-V Cluster nodes.
Run Direct Backup Set
1. Click the Backup Sets icon on the main interface of CloudBacko Pro

2. Create a new backup set by clicking the “+” icon or Add button to created new backup set.
3. Select the Backup set type MS Hyper-V Backup, Version Microsoft Hyper-V Server 2012 R2 (Failover Cluster), and name your new backup set then click Next to proceed.

4. In the Backup Source menu, select the guest virtual machines you would like to backup. Click Next to proceed.

5. Click Add to add a new schedule or double click on the existing schedule to change the values. Click Next to proceed when you are done setting.

The default backup schedule is daily backup at 22:00 with the backup job will run until completion and the retention policy job will be run immediately after the backup job.
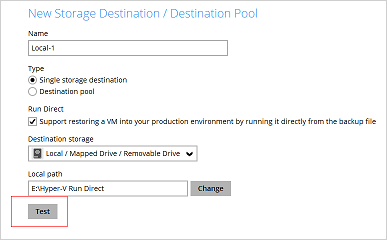
6. Select the backup storage destination.

For Hyper-V backup sets by the default the Run Direct feature is enabled.
- Click on Change to select the storage destination a Local, Mapped Drive, or Removable Drive.
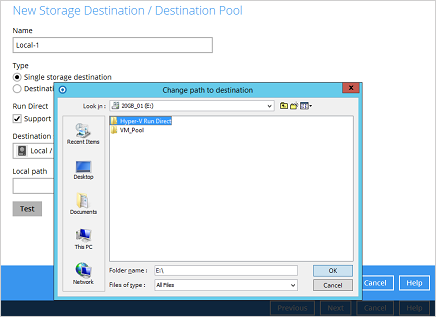
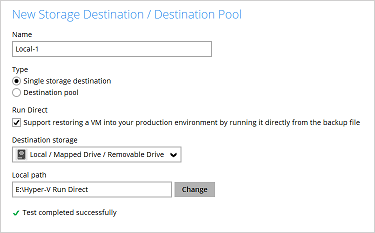
- After selecting the storage destination click on the Test button to verify if CloudBacko Pro has permission to access the folder on the storage destination.
- Once the test is finished CloudBacko Pro will display “Test completed successfully” message. Click OK to proceed.


For Hyper-V Cluster backup set with Run Direct enabled please ensure all nodes have access to the Local, Mapped Drive, or Removable Drive destination storage.
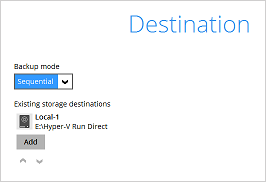
- To add extra storage destinations click Add, otherwise Click Next to proceed.

7. If you wish to enable the Granular Restore feature, make sure you turn on the Granular Restore switch in this menu. Click Next to proceed.

* Once the Granular Restore feature is enabled and the backup set is saved, it is NOT possible to disable it afterwards, and vice versa. If you wish to change the Granular Restore settings, a new backup set will have to be created.
* It is possible to enable both Granular Restore and Run Direct restore on the same backup set. However, CloudBacko Pro will only allow either Granular Restore or Run Direct restore to run, but not both to run concurrently.
If you have enabled the Granular Restore or Run Direct restore feature, backup data will not be compressed and encrypted to optimize restore performance, therefore you can skip to step 10.
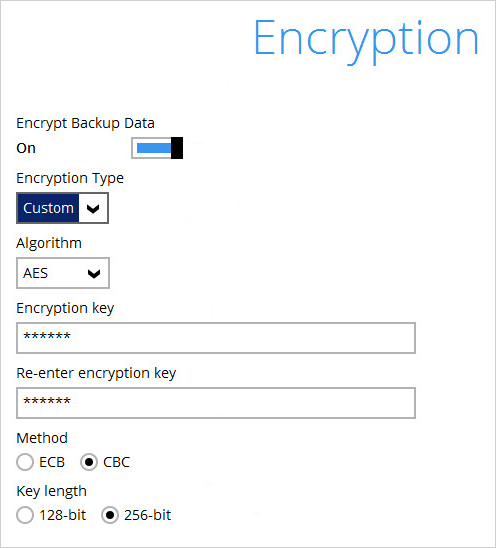
8. In the Encryption window, the default Encrypt Backup Data option is enabled with an encryption key preset by the system which provides the most secure protection.

You can choose from one of the following 2 Encryption Type options:
- Default – an encryption key with 44 alpha numeric characters will be randomly generated by the system
- Custom – you can customize your encryption key, where you can set your own algorithm, encryption key, method and key length.

For local, mapped drive, or removable drive storage destinations with Run Direct enabled the compression type will always be set No Compression and data encryption is disabled to ensure optimal backup and restore performance. The backup set compression type and data encryption settings will only be applied to CBS, SFTP/FTP, or Cloud storage destinations for the backup set.
9. If you have enabled the Encryption Key feature in the previous step, the following pop-up window shows, no matter which encryption type you have selected.

The pop-up window has the following three options to choose from:
- Unmask encryption key – The encryption key is masked by default. Click this option to show the encryption key.
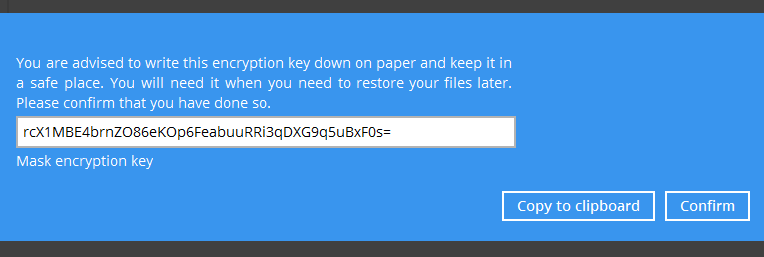
- Copy to clipboard – Click to copy the encryption key, then you can paste it in another location of your choice.
- Confirm – Click to exit this pop-up window and proceed to the next step.

10. Enter the Windows login credentials used by CloudBacko Pro to authenticate the scheduled or continuous backup job.

If the backup schedule is turned off for the backup set the Windows User Authentication screen will be automatically skipped. The Windows User Authentication login credentials can be added or update post backup set creation.
11. Configure a temporary directory for the backup set.
For Hyper-V server in Failover Cluster environment, the temporary directory must be set to a network shared path accessible to all cluster nodes, or a Cluster Shared Volume.

12. Backup set created.
i. Do NOT click the Backup now button. Click the Close button instead and go back to the main menu. Now we need to export the settings on this first node, and then import to the second node, export the settings on the second node and import to the third node, etc. until the last node in the cluster. Lastly, export the settings on the last node and import to the first node to complete the process.
ii. Go to Utitlities > Ex/Import Settings.

iii. Click Export Now.

iv. Choose to export the setting file to any volume in the cluster storage which is visible to all nodes.
v. Now go to the second node and launch CloudBacko Pro. Go to Utitlities > Ex/Import Settings, and click Import Now button.
vi. Select the settings.sys file from the location you saved it in the first node. In the Settings screen, check all the checkboxes.
vii. You should see Successfully import selected settings after successful import.
viii. If you have a third node, export the settings from the second node and perform step v to vii on the third node.
ix. Perform v to viii until reaching the last node. Then, export the settings from the last node and then go to the first node and import the settings to the first node.
x. On each node, go into Backup Sets, select the Hyper-V cluster backup set, and in the Owner filed, you should see all nodes there.
Non Run Direct Backup Set
1. Click the Backup Sets icon on the main interface of CloudBacko Pro

2. Create a new backup set by clicking the “+” icon or Add button to created new backup set.
3. Select the Backup set type MS Hyper-V Backup, Version Microsoft Hyper-V Server 2012 R2 (Failover Cluster), and name your new backup set then click Next to proceed.

4. In the Backup Source menu, select the guest virtual machines you would like to backup. Click Next to proceed.

5. Click Add to add a new schedule or double click on the existing schedule to change the values. Click Next to proceed when you are done setting.


The default backup schedule is daily backup at 22:00 with the backup job will run until completion and the retention policy job will be run immediately after the backup job.
6. Select the backup storage destination. To select a cloud, SFTP/FTP, or CBS as a storage destination un-select Run Direct setting and select your desired cloud, SFTP/FTP, or CBS as a storage destination. Click OK to proceed when you are done.

7. Click Add to an additional storage destination or click Next to proceed when you are done.

8. If you wish to enable the Granular Restore feature, make sure you turn on the Granular Restore switch in this menu. Click Next to proceed.

1. Once the Granular Restore feature is enabled and the backup set is saved, it is NOT possible to disable it afterwards, and vice versa. If you wish to change the Granular Restore settings, a new backup set will have to be created.
2. It is possible to enable both Granular Restore and Run Direct restore on the same backup set. However, CloudBacko Pro will only allow either Granular Restore or Run Direct restore to run, but not both to run concurrently.
If you have enabled the Granular Restore or Run Direct restore feature, backup data will NOT be compressed and NOT be encrypted to optimize restore performance, therefore you can skip to step 11.
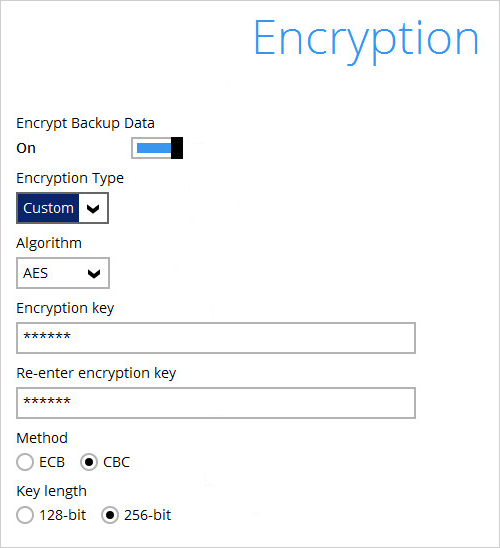
9. In the Encryption window, the default Encrypt Backup Data option is enabled with an encryption key preset by the system which provides the most secure protection.
You can choose from one of the following 2 Encryption Type options:
- Default – an encryption key with 44 alpha numeric characters will be randomly generated by the system
- Custom – you can customize your encryption key, where you can set your own algorithm, encryption key, method and key length.

For local, mapped drive, or removable drive storage destinations with Run Direct enabled the compression type will always be set No Compression and data encryption is disabled to ensure optimal backup and restore performance. The backup set compression type and data encryption settings will only be applied to CBS, SFTP/FTP, or Cloud storage destinations for the backup set.
10. If you have enabled the Encryption Key feature in the previous step, the following pop-up window shows, no matter which encryption type you have selected.

The pop-up window has the following three options to choose from:
- Unmask encryption key – The encryption key is masked by default. Click this option to show the encryption key.
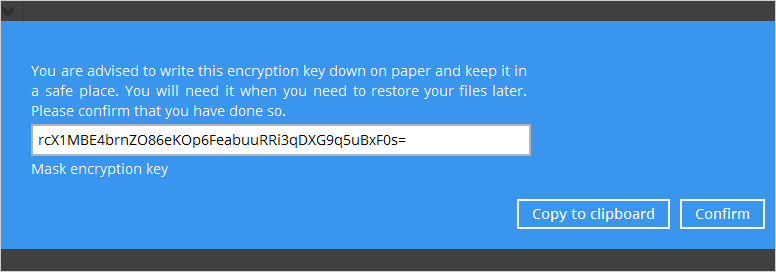
- Copy to clipboard – Click to copy the encryption key, then you can paste it in another location of your choice.
- Confirm – Click to exit this pop-up window and proceed to the next step.

11. Enter the Windows login credentials used by CloudBacko Pro to authenticate the scheduled backup job.

If the backup schedule is turned off for the backup set the Windows User Authentication screen will be automatically skipped. The Windows User Authentication login credentials can be added or update post backup set creation.
12. Backup set created.
i. Do NOT click the Backup now button. Click the Close button instead and go back to the main menu. Now we need to export the settings on this first node, and then import to the second node, export the settings on the second node and import to the third node, etc. until the last node in the cluster. Lastly, export the settings on the last node and import to the first node to complete the process.
ii. Go to Utitlities > Ex/Import Settings.
iii. Click Export Now.
iv. Choose to export the setting file to any volume in the cluster storage which is visible to all nodes.
v. Now go to the second node and launch CloudBacko Pro. Go to Utitlities > Ex/Import Settings, and click Import Now button.
vi. Select the settings.sys file from the location you saved it in the first node. In the Settings screen, check all the checkboxes.
vii. You should see Successfully import selected settings after successful import.
viii. If you have a third node, export the settings from the second node and perform step v to vii on the third node.
ix. Perform v to viii until reaching the last node. Then, export the settings from the last node and then go to the first node and import the settings to the first node.
x. On each node, go into Backup Sets, select the Hyper-V cluster backup set, and in the Owner filed, you should see all nodes there.
public/module/hyper-v/create_backup_set_cluster.txt · Last modified: 2019/09/20 15:30 by ronnie.chan