
Sidebar
public:module:office365:pro:preparation
This is an old revision of the document!
Preparation
Before configuring your first Office 365 backup set, make sure to read and perform the following preparation tasks.
Requirements
CloudBacko Pro Installation
Make sure that the latest version of CloudBacko Pro is installed on your computer with Internet access for connection to your Office 365 Exchange Online account. User should also stay up-to-date when newer version of CloudBacko Pro is released.
Add-on Module Requirement
One Office 365 Exchange Online Backup license is required for the backup of each user mailbox. No license is required for public folder.
Continuous Backup Module
The Continuous backup add-on module is required if would like to enable the continuous backup feature.
Java Heap Size
The default Java heap size setting on CloudBacko Pro is 1024MB for 32-bit machine, 2048MB for 64-bit machine. For Office 365 Exchange online backup, it is highly recommended to increase the Java heap size setting to at least 4096MB to improve backup and restore performance. The actual heap size is dependent on amount of free memory available on the machine with CloudBacko Pro installed (machine that is running the backup).
Office 365 Subscription Plan
The following subscription plans with Exchange Online email services are supported to run backup and restore on CloudBacko Pro.
| Office 365 Business Essentials | Office 365 Business Premium |
| Office 365 Education | Office 365 Enterprise E1 |
| Office 365 Enterprise E3 | Office 365 Enterprise E4 |
| Office 365 Enterprise E5 |
Office 365 Subscription Status
Make sure your Office 365 Exchange Online subscription with Microsoft is active in order to enjoy all privileges that come along with our backup services. If your account has expired, renew it with Microsoft as soon as possible so that you can continue enjoy the Office 365 Exchange Online backup services provided by CloudBacko.
When your account is expired, depending on your role, certain access restrictions will be applied to your account. Refer to here for more details: Microsoft Office 365 Subscription Status
Configure Office 365 Administrator Account
Granting Permission to Accounts for Creating Backup Set
Before the Office 365 account administrator or other accounts can create a backup set, the administrator has to grant permission to the account(s) which are going to create backup set. The account must be a member of the following security groups:
- Discovery Management
- Public Folder Management
Follow the steps below to grant permission to user account.
i. Open https://outlook.office365.com/ecp
ii Login to the Exchange admin center as an account administrator.

iii. Select the permissions menu on the left, then double click on Discovery Management or Public Folder Management on the right.

iv. You can now add users to this group. Click the + icon under the Members section.

v. Look for the username(s) of the account that you would like to add permission for, then click add > OK to add the corresponding user(s) to the permission group.

v. Click Save to confirm and exit the setting.
Granting Permission for Application Impersonation
This permission allows users added under the Members section of the Discovery Management group (refer to the previous section for setup) to back up and/or restore mailbox item(s) not only for their own account, but also the accounts of other users in the same Members section. To grant permission for this feature, you have to add the Application Impersonation role by following the steps below.
1. Open https://outlook.office365.com/ecp
2. Login to the Exchange admin center as an account administrator.

3. Select the permissions menu on the left, then double click on Discovery Management on the right.

4. Click the + icon under the Role section.

5. Select the ApplicationImpersonation role, then click the add button. Click OK afterward.

6. Click Save to confirm and exit the setting.
Granting Root Permission for Exchange Online Public Folders Backup
This permission allows users to backup public folders of Exchange Online.

Supported Source
Mailbox Level
Below is the supported mailbox type of Office 365 Exchange Online Backup.
| Item | Supported? |
|---|---|
| User mailbox | ✔ |
| Room Mailbox | ✔ |
| Public Folder | ✔ |
| Equipment Mailbox | ✔ |
| Public Folder Mailbox | ✔ |
| Shared Mailbox | ✔ |
Folder Level
Below is the items that you can backup or restore from an Office 365 Exchange Online backup set.
| Item | Supported? |
|---|---|
| Inbox | ✔ |
| RSS Feeds | ✔ |
| Drafts | ✔ |
| Junk Email | ✔ |
| Sent Items | ✔ |
| Tasks | ✔ |
| Deleted Items | ✔ |
| Calendar | ✔ |
| Archive | ✔ |
| Contacts | ✔ |
| Notes | ✔ |
Limitation
For backup and restoration of Office 365 Exchange Online backup set, there are some limitations:
- If you are trying to restore item(s) from one mailbox to an alternate location mailbox, CloudBacko Pro will restore the item(s) to their respective destination folder(s) with the same name of the original folder(s).
Example: Item from “Inbox” folder of Mailbox-A will be restored to the “Inbox” folder of the alternate location Mailbox-B; Item from “Drafts” folder of Mailbox-A will be restored to the “Drafts” folder of the alternate location Mailbox-B.
- If you are trying to restore item(s) from several mailboxes to an alternate location mailbox, CloudBacko Pro will restore the item(s) to their respective destination folder(s) in alternate location mailbox with the same name of the original folder(s).
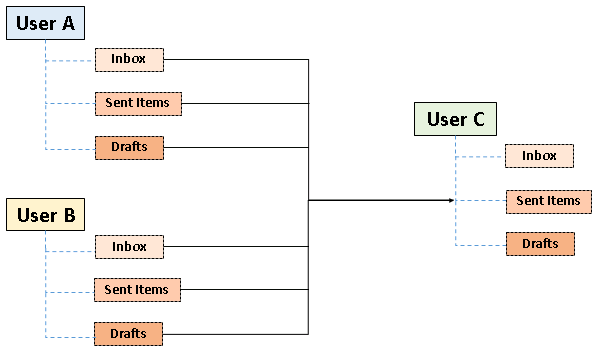
Example: Item from “Inbox” folder of Mailbox-A and Mailbox-B will be restored to the “Inbox” folder of the alternate location Mailbox-C. - Restore of the mailbox items or public folder items is only supported if the according mailbox or public folder exists.
- Only administrator account or user account with administrative authority can restore backup mailbox items to an alternate location.
- Restore of mailbox item(s) in public folder to an alternate location mailbox is not supported.
Example: Restore of mailbox item(s) in public folder from Mailbox-A to alternate location Mailbox-B is not supported. - If you are trying to restore the mailbox item to a destination mailbox which has a different language setting than the original mailbox, CloudBacko Pro will restore mailbox item(s) to their respective destination folder based on the translation listed below.
For folders such as “Calendar” or “Notes”, a new folder “Calendar” or “Notes” will be created.

| Backup source (English) | Action | Destination mailbox with Chinese as default language settings |
|---|---|---|
| Inbox | Merge | 收件箱 |
| Outbox | Merge | 寄件匣 |
| Sent Items | Merge | 寄件備份 |
| Deleted Items | Merge | 刪除的郵件 |
| Drafts | Merge | 草稿 |
| Junk E-Mail | Merge | 垃圾電郵 |
| Calendar | Create new folder | Calendar |
| Notes | Create new folder | Notes |
Best Practices and Recommendations
The following are some best practices or recommendations we strongly recommend you to follow before you start any Office 365 Exchange Online backup and restore.
Temporary Directory Folder Location
Temporary directory folder is used by CloudBacko Pro for storing backup set index files and any incremental or differential backup files generated during a backup job. To ensure optimal backup/restoration performance, it is recommended that the temporary directory folder is set to a local drive with sufficient free disk space.
Performance Recommendations
Consider the following best practices for optimized performance of the backup operations:
- Enable schedule backup jobs when system activity is low to achieve the best possible performance.
- Perform test restores periodically to ensure your backup is set up and performed properly. Performing recovery test can also help identify potential issues or gaps in your recovery plan. It's important that you do not try to make the test easier, as the objective of a successful test is not to demonstrate that everything is flawless. There might be flaws identified in the plan throughout the test and it is important to identify those flaws.
Individual Mail Object Size
Office 365 Exchange Online service has set a size limit for individual mail object to be uploaded. Considering the size of the mail object may become larger as a result of the transcoding process when it is being sent out, we strongly recommend you to keep individual mail object no larger than 80MB if you definitely want it to be backed up.
Backup Destination
To provide maximum data protection and flexible restore options, it is recommended to configure:
- At least one offsite or cloud destination
- At least one local destination for fast recovery
Large amount of Mailboxes to Backup
It is recommended to divide the mailboxes into multiple backup sets. By default, the Office 365 Exchange online backup module can back up a maximum of 4 mailboxes concurrently (4 concurrent backup threads), while backing up a maximum of 4 mail items concurrently per mailbox (4 concurrent backup threads). Therefore, each backup set supports a maximum of 4×4=16 backup threads at a time. By splitting up all mailboxes into separate backup sets, the more backup sets, the faster the backup process can achieve.
Example-1: There are 100 mailboxes needed to be backup, you can divide 20 mailboxes into one backup set.
| Backup Set Name | Mailbox Number |
|---|---|
| Badkup-Set-1 | No.1 – 20 |
| Badkup-Set-2 | No.21 – 40 |
| Badkup-Set-3 | No.41 – 60 |
| Badkup-Set-4 | No.61 – 80 |
| Badkup-Set-5 | No.81 – 100 |
If there is new mailboxes added, you can create new backup set for the new mailboxes.
Example-2: There are 100 mailboxes needed to be backup, you can divide mailboxes into backup sets in alphabetic order.
| Backup Set Name | Mailbox Name Start with |
|---|---|
| Badkup-Set-1 | A – E |
| Badkup-Set-2 | F – J |
| Badkup-Set-3 | K –O |
| Badkup-Set-4 | P – T |
| Badkup-Set-5 | U – Z |
If there is new mailboxes added, you can divide the new mailboxes into the original backup sets by the corresponding alphabetic order.
public/module/office365/pro/preparation.1568881241.txt.gz · Last modified: 2019/09/19 16:20 by ronnie.chan