Table of Contents
2. Preparation for Backup and Restore
2.1 Requirement
You are strongly recommended to configure or check all the settings below to confirm all the requirements are met before you proceed with the Exchange Mail Level backup and restoration.
2.1.1 Software Requirement
Refer to the following article for the list of compatible operating systems and application versions:
CloudBacko Pro Supported Software Applications
2.1.2 Antivirus Exclusion Requirement
To optimize performance of CloudBacko Pro on Windows, and to avoid conflict with your antivirus software, refer to the following article the list of processes and directory paths that should be added to all antivirus software white-list / exclusion list: Exclusion of CloudBacko in your Antivirus software
The bJW.exe process is automatically added to Windows Defender exclusion list for Windows 10 and 2016 during installation / upgrade via installer or upgrade via AUA.
2.1.3 Upgrade VMware Tools Requirement
To avoid unexpected java crash, if the Windows machine is a guest VM hosted on a VMware Host then it is highly recommended that the VMware tools version installed on the guest VM must be 10.0.5 or above.
Below is the warning message that will be displayed if the version of the VMware Tools is less than 10.0.5.
2.1.4 CloudBacko Pro Installation
- CloudBacko Pro v4 or above must be installed either on the Exchange Server 2016 / 2019 hosting the database or on the remote backup machine.
- CloudBacko Pro v4 or above must be installed either on the Exchange Server 2013 hosting the database or on the remote backup machine.
2.1.5 Continuous Backup Module
The Continuous backup add-on module is required if you would like to enable the continuous backup feature.
2.1.6 Java Heap Size
The default Java heap size setting on CloudBacko Pro is 2048MB. For Exchange 2013 / 2016 / 2019 mail level backup, it is highly recommended to increase the Java heap size setting to be at least 4096MB to improve backup and restore performance. The actual heap size is dependent on amount of free memory available on your Exchange 2016 / 2019 server.
2.1.7 Temporary Directory Folder
Temporary Directory folder is used by CloudBacko Pro for storing backup set index files and any incremental or differential delta files generated during a backup job. To ensure optimal backup/restoration performance, it is recommended that the temporary directory folder is located on a local drive with sufficient free disk space.
2.1.8 Mailbox Role
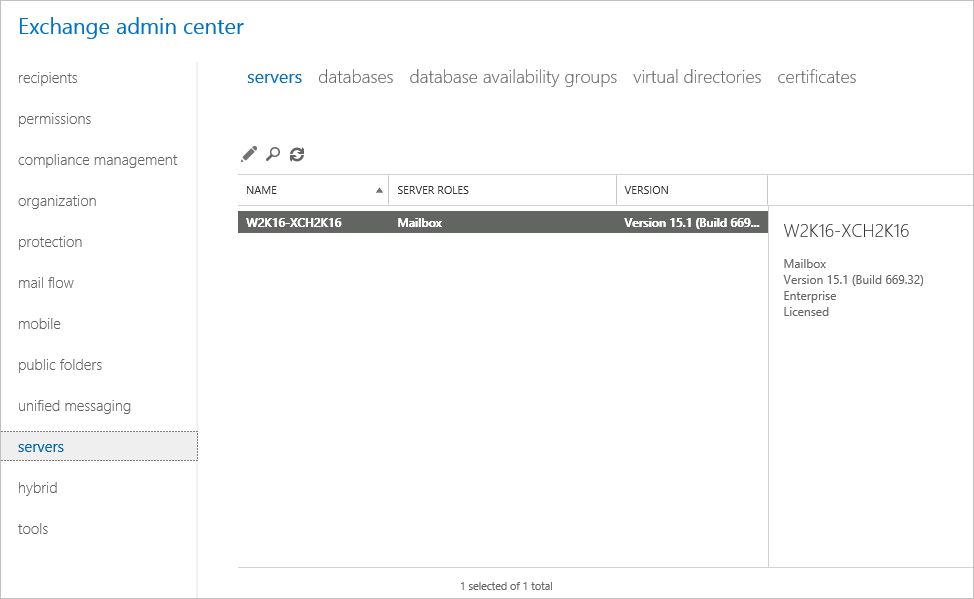
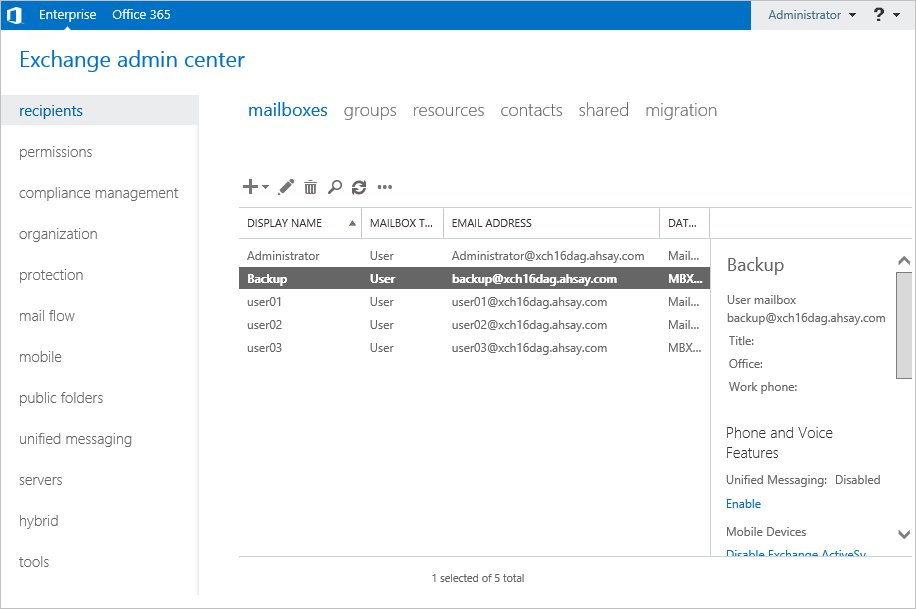
Ensure all nodes have mailbox role. This can be checked by accessing the Exchange admin center (EAC).
2.1.9 Operating System
- For CloudBacko Pro installed on the Exchange Server 2013/2016/2019, the operating system must be Windows Server 2012/ 2012 R2/ 2016 / 2019 or above.
- For CloudBacko Pro installed on the remote backup machine, the operating system must be Windows 7/ 8/ 8.1/ 10 or Windows Server 2008/ 2008 R2/ 2012/ 2012 R2/ 2016 / 2019 or above.
2.1.10 Supported Exchange Server 2013 / 2016 / 2019 Version
- MS Exchange Server 2013 Cumulative Update 3 (CU3) or later is supported.
- MS Exchange Server 2016 Cumulative Update 4 (CU4) or later is supported.
- MS Exchange Server 2019 Cumulative Update 1 (CU1) or later is supported
2.1.11 Exchange Servers Properties
To check the properties of Exchange Servers, use the Get-ExchangeServer cmdlet found in the Exchange Management Shell.
Example: Get-ExchangeServer | Format-List Name, Edition,AdminDisplayVersion
Please refer to the following Microsoft article for details of MS Exchange build numbers and releases: https://docs.microsoft.com/en-us/exchange/new-features/build-numbers-and-release-dates?view=exchserver-2019
2.1.12 Windows User Account Permission
The Windows user account used for the backup must be a member of the following security groups.
Exchange Server 2013/2016/2019
- Public Folder Management
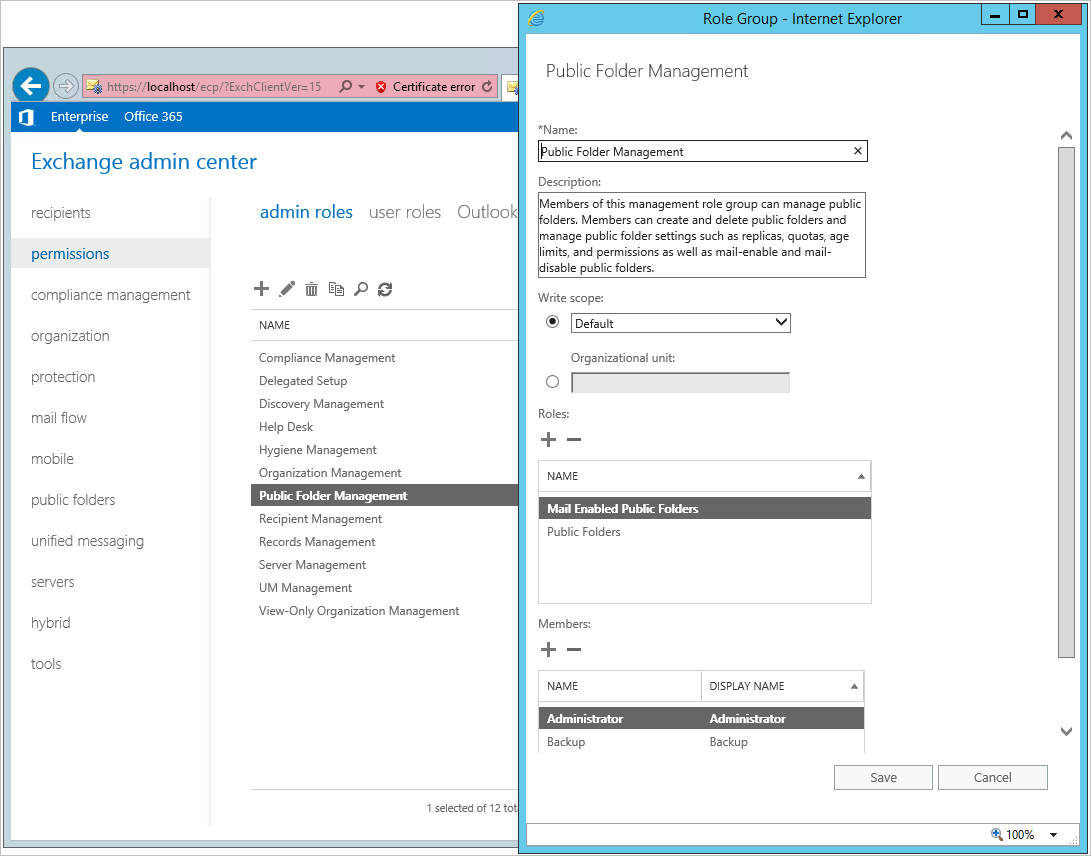
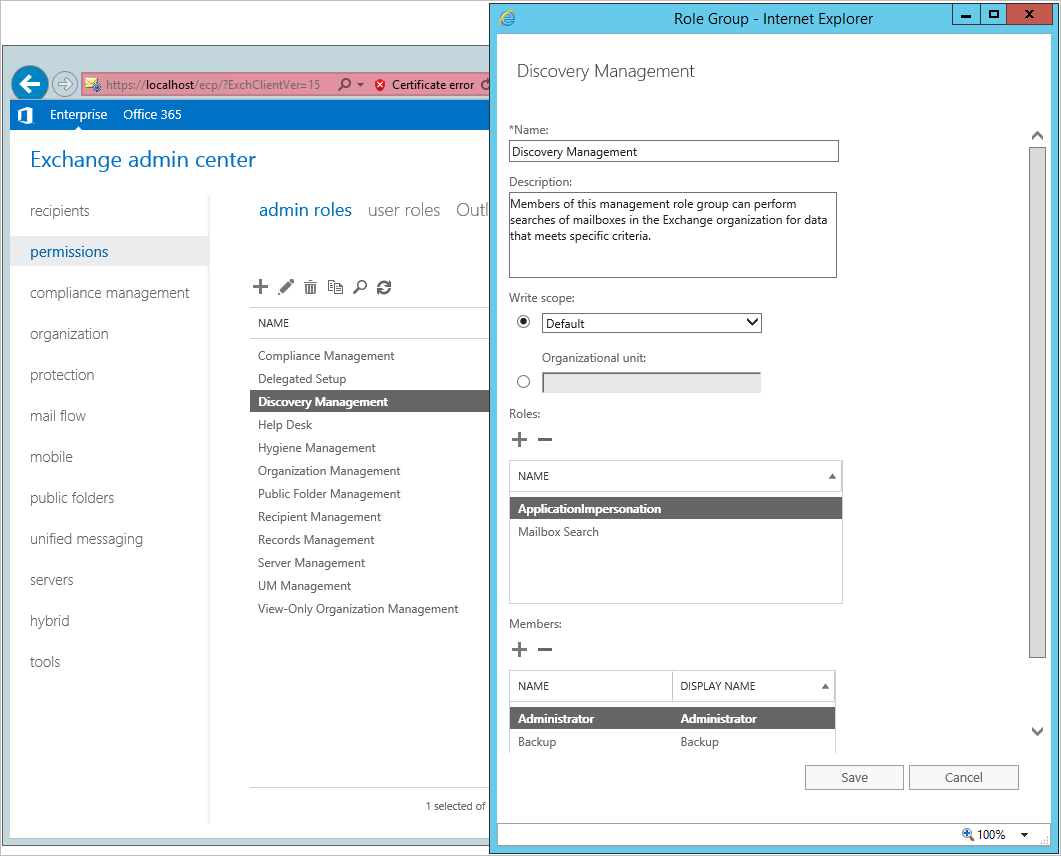
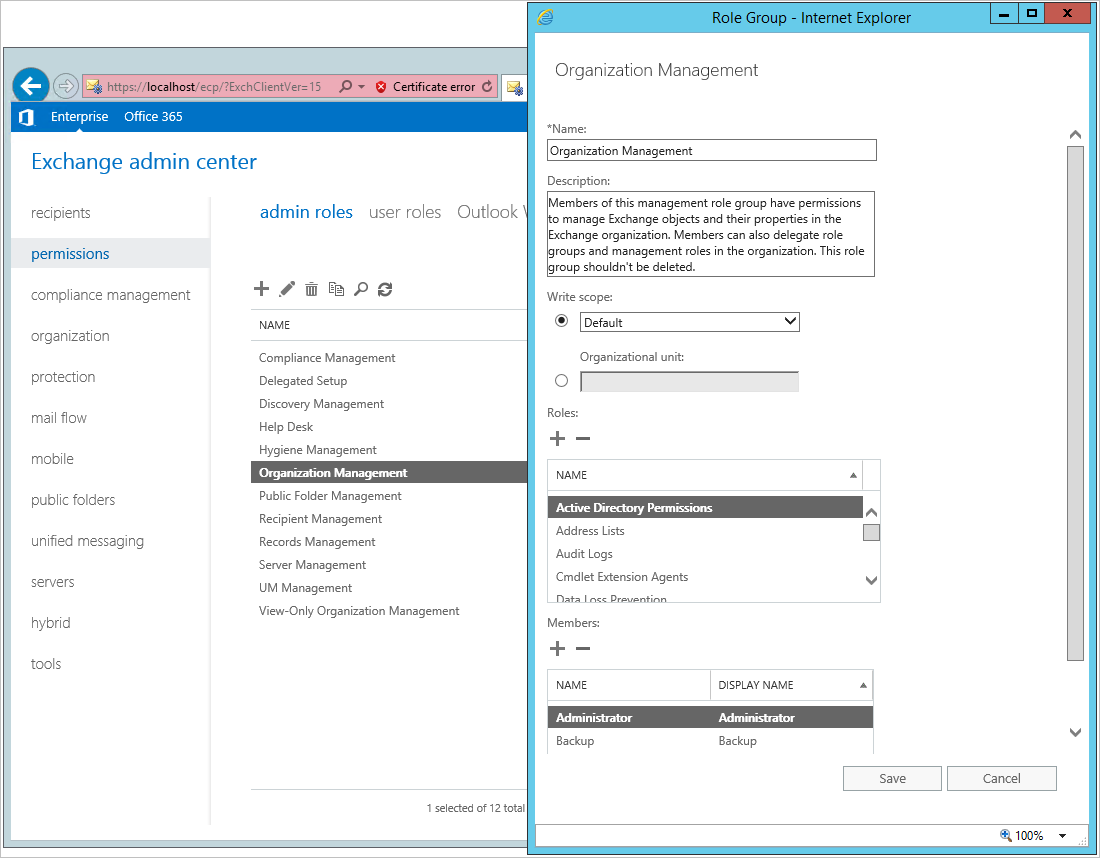
Login to the Exchange admin center, under permissions, admin roles. Assign the user to be running the backup as member of the following admin roles:- Discovery Management (including the following Roles):
- ApplicationImpersonation
- Mailbox Search
- Organization Management
- Public Folder Management
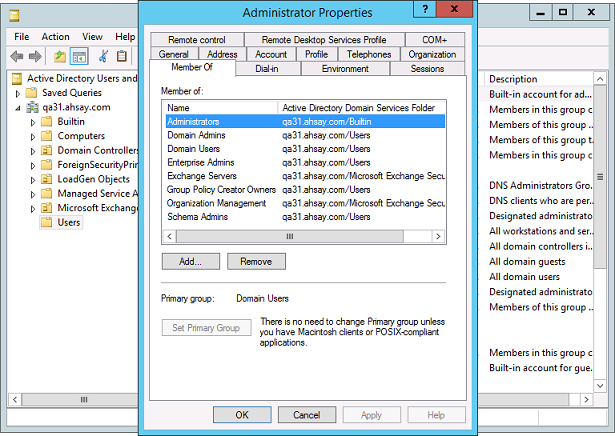
Exchange Server 2013
- Microsoft Exchange Security \ Organization Management
- Users \ Administrator
- Users \ Domain Admins
Steps to check the current settings
1. Click Start > Control Panel > Administrative Tools, and then click Active Directory Users and Computers.
2. Browse to the organization unit containing the corresponding operating system account.
3. Right click on the user, and select Properties.
Select the Member Of tab to check on the membership setting.
2.1.13 Enabling Mailbox
The Windows user account must have an Exchange Server mailbox. Refer to the URL below for more information.
Exchange Server 2013/2016/2019
Refer to the following article from Microsoft for more details on how to check if an account is mailbox enabled and how to enable it: https://docs.microsoft.com/en-us/Exchange/recipients/create-user-mailboxes?view=exchserver-2019
Exchange Server 2013
Refer to the following article from Microsoft for more details on how to check if an account is mailbox enabled. https://docs.microsoft.com/en-us/exchange/create-user-mailboxes-exchange-2013-help
Grant Mailbox Access Permission (Full Access)
Enter the following command in the Exchange Management Shell
Get-Mailbox | Add-MailboxPermission –User “%os_username%” –AccessRights FullAccess
Example: granting permission to “administrator” account
Get-Mailbox | Add-MailboxPermission –User “administrator” –AccessRights FullAccess
2.1.14 Login Name Format Requirement
Make sure the Username for connecting the Exchange Server is entered in the format of “user@hostname” (e.g. admin@cloudbacko.local). It is the same one you can find under the mailbox setting of the Exchange user account on Exchange Admin Center.
2.1.15 Backup Source Requirement
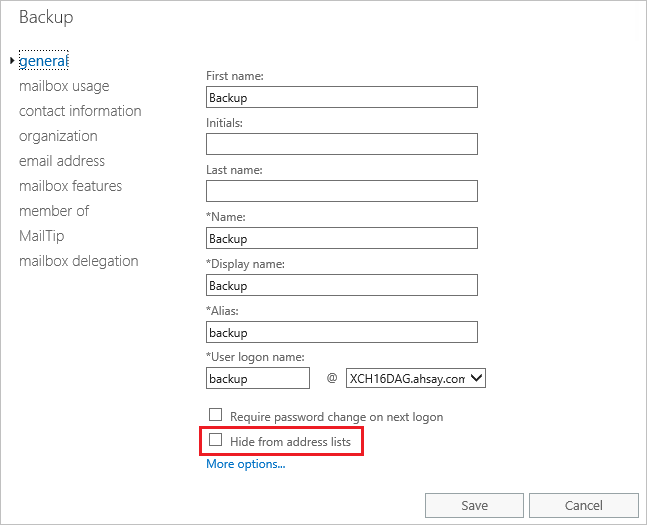
Ensure that the “Hide from address lists” option is unchecked for all mailboxes to be selected for backup. Mailbox hidden from the address list will not be shown in the backup source selection menu.
2.1.16 Port Configuration
As Exchange 2013 / 2016 / 2019 mail level backup and restore is implemented using Microsoft EWS API (Exchange Web Services), which enables CloudBacko Pro to access mailbox items such as email message, meetings, notes, calendar, contact, etc., without any additional installation or complicated setup required on the Exchange 2013 / 2016 / 2019 Server or remote backup machine, only port 443 must be configured to allow communication between CloudBacko Pro and Exchange server.
2.1.17 Exchange related Windows Services
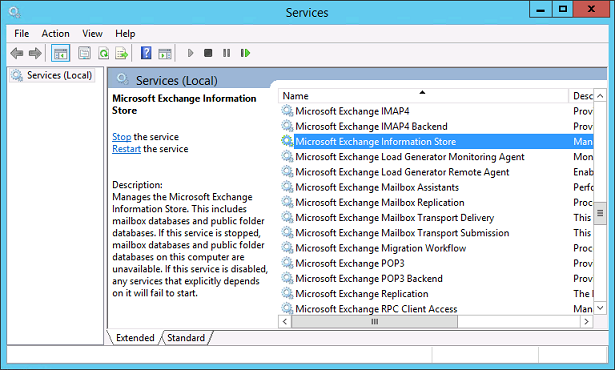
Ensure all MS Exchange related services have been started, particularly the MS Exchange Information Store.
To verify this setting, launch the Services menu by clicking Start then typing “Services” in the search box. All Exchange related services should be started by default, in case it is not, turn it on by right clicking the item and then select Start.
2.1.18 MS Exchange Databases
Ensure the MS Exchange Mailbox and Public Folder databases are mounted. This can be verified by Exchange Management Shell or Exchange Admin Center (EAC).
- Type the following command in the Exchange Management Shell.
* Exchange Admin Center (EAC) \\ {{public:module:microsoft_exchange_mail_level_ews:image084.png?800}}
2.1.19 Windows PowerShell
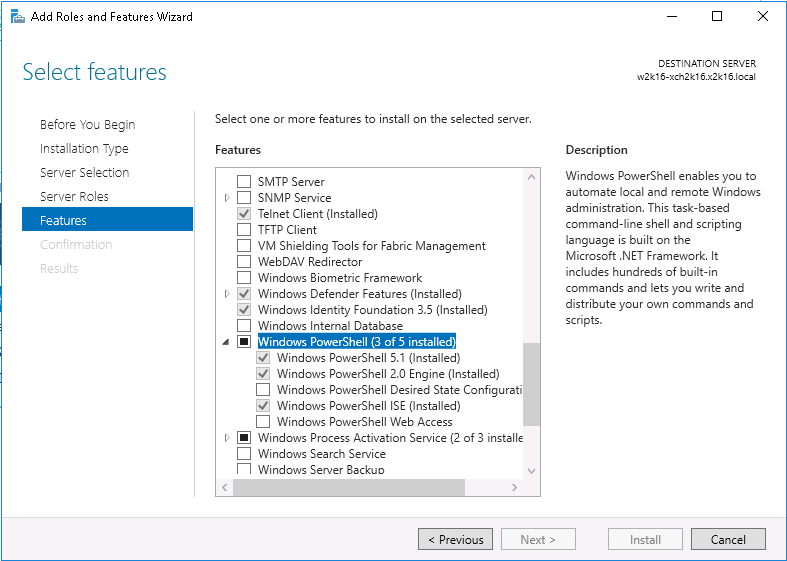
Windows PowerShell 5.1 Engine for Exchange Server 2016/2019
Ensure that Windows PowerShell 5.1 Engine is installed.
To install the feature:
- Navigate to Server Manager > Manage, then select Add Roles and Features.
- On the Select installation type screen, select Role-based or feature-based installation.
- Select the target server.
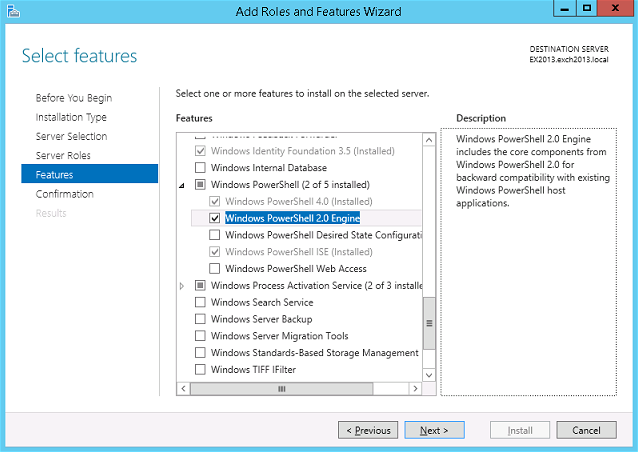
Windows PowerShell 2.0 Engine for Exchange Server 2013
Make sure the Windows PowerShell 2.0 Engine is installed.
To install the feature:
- Navigate to Server Manager > Manage, then select Add Roles and Features.
- On the Select installation type screen, select Role-based or feature-based installation.
- Select the target server.
2.1.20 .Net Framework
.Net Framework 4.6.2 Features for Exchange Server 2016/2019
Ensure .Net Framework 4.6.2 Features is installed. Please refer to the following URL for detailed information: https://docs.microsoft.com/en-us/Exchange/plan-and-deploy/system-requirements?view=exchserver-2016
This feature can be enabled by accessing Server Manager > Dashboard > Manage > Add Roles and Features Wizard > Feature Page.
.Net Framework 4.6.2 Features for Exchange Server 2013
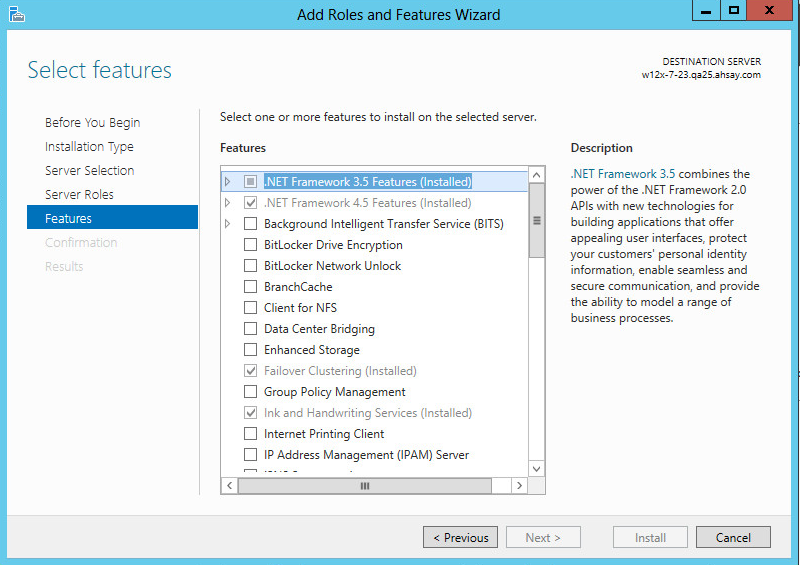
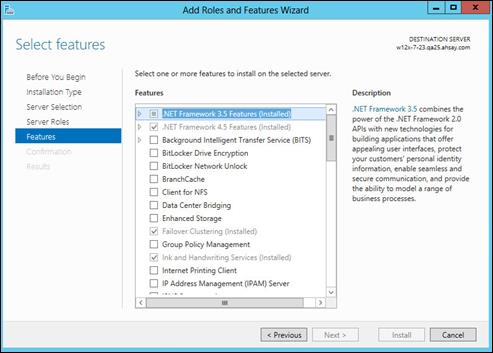
If you are using Exchange server 2013 on Windows server 2012, please install .Net Framework 3.5 Features.
This feature can be enabled by accessing Server Manager > Dashboard > Add Roles and Features Wizard > Feature Page.
2.1.21 Remote Exchange Management Shell
For setup on MS Exchange Server 2013, the Remote Exchange Management Shell must be enabled for the operating system account used for the backup.
Enter the following command in Exchange Management Shell to enable this feature.
>Set-User "%os_username%" -RemotePowerShellEnabled $True
Reboot the Exchange Server after executing the command.
Remote Shell in Microsoft Exchange Server enables you to manage your server running Exchange.
2.1.22 LAN Manager Authentication Level
Exchange Server 2013
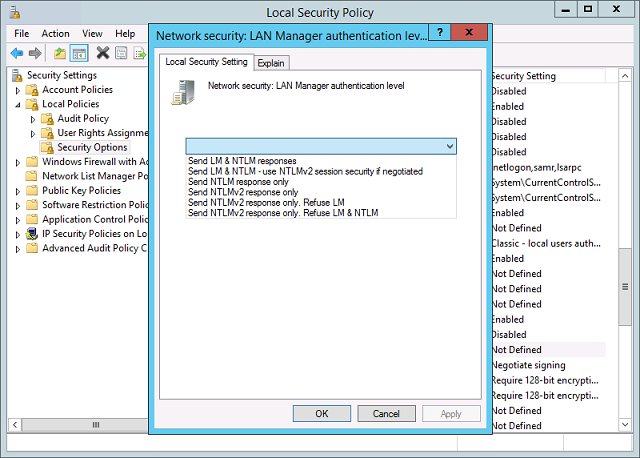
The LAN Manager Authentication level configured on the Exchange Server must be level 3 or above. Follow the steps below to check the settings.
a. Click Start > Control Panel > Administrative Tools, and then click Local Security Policy.
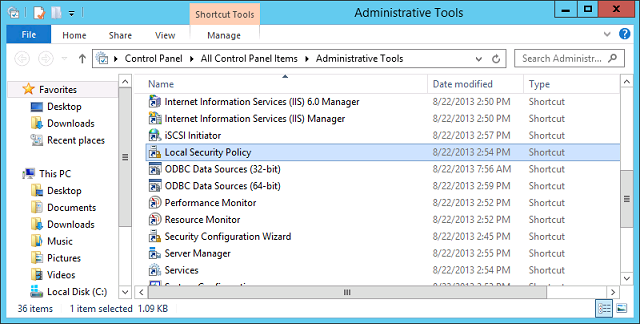
b. Under Security Settings, expand Local Policies > Security Options, then click Network security: LAN Manager authentication level.
c. Make sure that the setting is configured to use NTLMv2, for example:
- Send NTLMv2 response only
- Send NTLMv2 response only. Refuse LM
2.1.23 IISAuthenticationMethods Setting
Verify if the IISAuthenticationMethods is set to Basic only. If so, change the setting with the commands below.
Exchange Server 2013
a. Click Start > Microsoft Exchange Server > Exchange Management Shell.
b. Enter the following command to check on the IISAuthenticationMethods setting:
>Get-OutlookAnywhere
c. If it is set to {Basic} only, enter the following command to modify the setting:
>Set-OutlookAnywhere -Identity:"%Server%\Rpc (Default Web Site)" -IISAuthenticationMethods Basic,NTLM,Negotiate
Reboot the Exchange server.
2.2 Supported Source
Below is the supported mailbox type of Exchange Server 2013 / 2016 / 2019 Mail Level backup.
| Mailbox Level | |
|---|---|
| Item | Supported? |
| User mailbox | ✔ |
| Public Folder | ✔ |
| Public Folder Mailbox | ✔ |
| Room Mailbox | ✔ |
| Equipment Mailbox | ✔ |
| Shared Mailbox | ✔ |
Below are the items that you can backup or restore from an Exchange Server 2013 / 2016 / 2019 Mail Level backup set.
| Folder Level | |
|---|---|
| Folder | Supported? |
| Inbox | ✔ |
| Drafts | ✔ |
| Sent Items | ✔ |
| Deleted Items | ✔ |
| Archive | ✔ |
| Notes | ✔ |
| RSS Feeds | ✔ |
| Junk Email | ✔ |
| Tasks | ✔ |
| Calendar | ✔ |
| Contacts | ✔ |
2.3 Limitation
For backup and restoration of Exchange 2013 / 2016 / 2019 Mail Level backup set, there is some limitation:
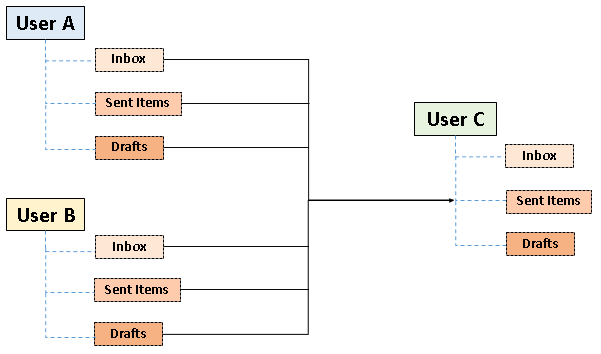
a. If you are trying to restore item(s) from one mailbox to an alternate location mailbox, CloudBacko Pro will restore the item(s) to their respective destination folder(s) with the same name of the original folder(s).
Example: Item from “Inbox” folder of Mailbox-A will be restored to the “Inbox” folder of the alternate location Mailbox-B; Item from “Drafts” folder of Mailbox-A will be restored to the “Drafts” folder of the alternate location Mailbox-B.
b. If you are trying to restore item(s) from several mailboxes to an alternate location mailbox, CloudBacko Pro will restore the item(s) to their respective destination folder(s) in alternate location mailbox with the same name of the original folder(s).
Example: Item from “Inbox” folder of Mailbox-A and Mailbox-B will be restored to the “Inbox” folder of the alternate location Mailbox-C.
c. Restore of mailbox items or public folder items is only supported if the according mailbox or public folder exists.
d. Only Alternate Location is supported for restoring mailbox items to another domain.
e. Restore of mailbox item(s) in public folder to an alternate location mailbox is not supported.
Example: Restore of mailbox item(s) in public folder from Mailbox-A to alternate location Mailbox-B is not supported.
f. If you are trying to restore the mailbox item to a destination mailbox which has a different language setting than the original mailbox, CloudBacko Pro will restore mailbox item(s) to their respective destination folder based on the translation listed below.
For folders such as ‘Calendar’ or ‘Notes’, a new folder ‘Calendar’ or ‘Notes’ will be created.
| Backup source (English) | Action | Destination mailbox with Chinese as default language settings |
|---|---|---|
| Inbox | Merge | 收件箱 |
| Outbox | Merge | 寄件匣 |
| Sent Items | Merge | 寄件備份 |
| Deleted Items | Merge | 刪除的郵件 |
| Drafts | Merge | 草稿 |
| Junk E-Mail | Merge | 垃圾電郵 |
| Calendar | Create new folder | Calendar |
| Notes | Create new folder | Notes |
2.4 Best Practice and Recommendation
The following are some best practices or recommendations we strongly recommend you follow before you start any Exchange Server 2013 / 2016 / 2019 Mail Level backup and restore.
- Mail Level Backup must be utilized in conjunction with Database Level Backup to fully protect an Exchange Server.
- Active Directory server should be protected by regular full Window System Backup at least once every two weeks.
- For CloudBacko Pro installed on Exchange Server, enable scheduled backup jobs when system activity is low to achieve the best possible performance.
- The remote backup machine should be on the same LAN as the MS Exchange server for optimal backup and restore performance.
- To provide maximum data protection and flexible restore options, it is recommended to configure:
- At least one offsite or cloud destination
- At least one local destination for fast recovery
- Perform test restores periodically to ensure your backup is set up and performed properly. Performing recovery test can also help identify potential issues or gaps in your recovery plan. It's important that you do not try to make the test easier, as the objective of a successful test is not to demonstrate that everything is flawless. There might be flaws identified in the plan throughout the test and it is important to identify those flaws.
- Distributed Backup Solution: For backup of multiple or mass backup sets, to achieve better backup performance and to minimize any unnecessary loading on the Exchange server, please consider deploying CloudBacko Pro on remote backup machines as distributed backup solution instead of on the MS Exchange server.
- For backup of a large number of mailboxes, it is recommended to divide all mailboxes into multiple backup sets. By default, the MS Exchange 2013 / 2016 / 2019 mail level backup module can back up a maximum of 4 mailboxes concurrently (4 concurrent backup threads), while backing up a maximum of 4 mail items concurrently per mailbox (4 concurrent backup threads). Therefore, each backup set supports a maximum of 4×4=16 backup threads at a time. By splitting up all mailboxes into separate backup sets, the more backup sets, the faster the backup process can achieve.
Example-1: There are 100 mailboxes that need to be backup, you can divide 20 mailboxes into one backup set.
| Backup Set Name | Mailbox Number |
|---|---|
| Backup-Set-1 | No.1 – 20 |
| Backup-Set-2 | No.21 – 40 |
| Backup-Set-3 | No.41 – 60 |
| Backup-Set-4 | No.61 – 80 |
| Backup-Set-5 | No.81 – 100 |
| Note: If there are new mailboxes added, you can create new backup set for the new mailboxes. | |
Example-2: There are 100 mailboxes that needs to be backup, you can divide mailboxes into backup sets in alphabetic order.
| Backup Set Name | Mailbox Name Start with |
|---|---|
| Backup-Set-1 | A – E |
| Backup-Set-2 | F – J |
| Backup-Set-3 | K –O |
| Backup-Set-4 | P – T |
| Backup-Set-5 | U – Z |
| Note: If there are new mailboxes added, you can add the new mailboxes into the original backup set by the corresponding alphabetic order. | |

